


Hello Everyone,
No one can live without Love. The Day of Love is already around the corner and the celebration has already started off. I am here to make the day more special and memorable. So today I will be sharing a makeup tutorial which is perfect for decking this Valentine ’s Day deck up. Red is the color of Love, but I feel the color Pink emphasizes the Love more. So here I choose Pink gradient eye makeup for Valentine’s Day special look. I think it will add that pink glow to your face, making you look fresh and radiant. The eye makeup will instantly brighten up the eyes. In this makeup, I have chosen 4 different shades of pink which are lilac, pink, purple tone pink, fuschia and plum pink. So without further ado, let’s move on to the tutorial now.
Steps for Eye makeup


Step 1:
Prep your eyes with primer and concealer to cancel any discoloration.
Step 2:
Take a matte pink shade in a fluffy blending brush and buff it into the crease. Blend the harsh edges.
Step 3:
Take a matte fuchsia pink eyeshadow in the same fluffy blending brush and start intensifying the crease area. Keep on packing and blending.
Step 4:
To deepen the outer v, take a plum tone pink with a pencil brush and start creating the outer v shape. Now blend the 3 colors softly with a narrow fluffy blending brush. Go on with very light hand, so that the colors do not lose the intensity.
Step 5:
Now take a lilac shade on a wet flat shedder blush and pack the color on the lid. Keep on packing until getting the desired result.
Step6:
This will create a harsh line between lilac and pink color, so we have to mix both colors seamlessly with a purple tone pink shade. It is the most important step; do not just blend the harsh edges with a blending brush. It will decrease the intensity of the lilac shade. So do take a purple tone pink shade in a fluffy blending brush and blend the harsh edges. It will add that nice gradation effect.
Step 7:
Go on softly. Keep packing and blending until you get the desired result.
Step 8:
Now draw a cat or winged liner. Apply black kohl in the lower lash line, do not take it all the way to the inner corner, keep it at ½ of the lash line through. Smudge it with same plum tone pink eyeshadow.
Step 9
Apply a shimmery rose gold shade on the tear duct area and a highlighter shade the brow bone area.Tight line both the eyes. Groom your brows.
Step 10:
Wipe off any fallout. Conceal under eye area. Apply loads of mascara to finish off your look.
Steps for face makeup
Step 1:
Conceal any spot or redness around the face and then apply your favorite foundation and stating blending with wet beauty sponge for a flawless base.
Step 2:
Contour under cheekbones, jawline, and forehead with LA Pro HD concealer in shade Toast. Don’t forget to contour your nose.
Step 3:
Apply a pink blush on the apple of cheeks.
Step 4:
Apply Makeup Revolution Pro Illuminate Highlighter with a fan brush as a highlighter on the forehead, bridge of the nose, the tip of the nose, cheekbones and cupid bow.
Step 5:
Apply an earthy pinky-brown lipstick.
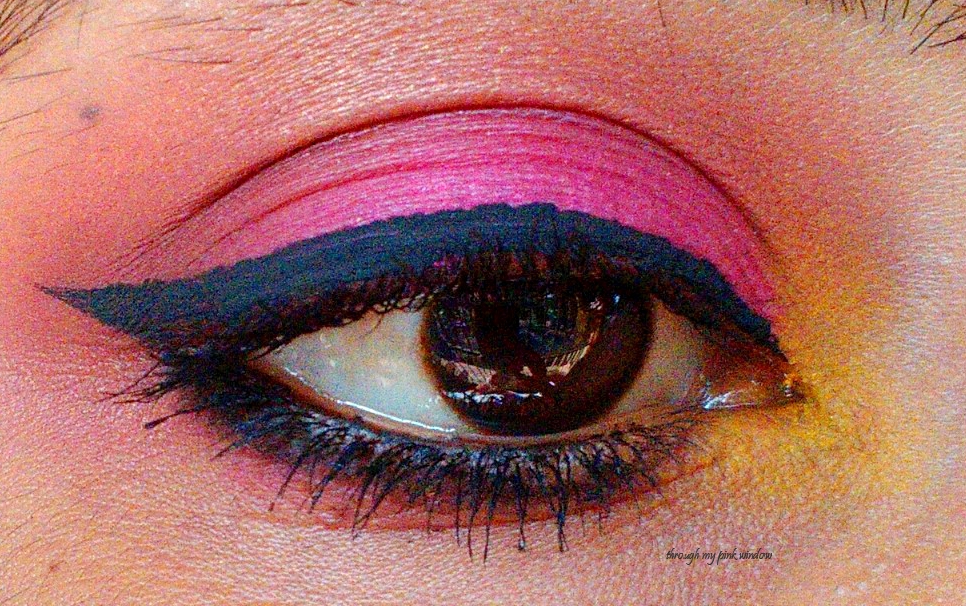
And the final look is-


Also Read: Christmas Party Makeup Look
Also Read: Halloween Special Makeup
Also Read: Diwali Makeup Look


This post is part of #shareURlove blog train is initiated By Dipika Singh from www.gleefulblogger.com and Minakshi Bajpai from www.mommystimeline.com .
I would like to thank Gurjeet Chabbra of Prism Around Gurjeet blog for introducing me. Now the next station of this love train is Jhilmil’s Blog- Mommyinme. Further, I would like to introduce our super dynamic Jhilmil Bansali who is a passionate traveler and marketing professional, she celebrates mommyhood every day through her blogging. Make sure to check her blog too.
What do you think of today’s look? Did you enjoy it? If you have any suggestion, please do let me know in the comment below. I would love to hear. If you are going to try this look then share your makeup look with #throughmypinkwindow, so that I can check and appreciate.
That’s all for today, stay tuned for more such tutorial
Love
Papri